on
Creating our first public web server
We’ve created a VPC, let’s put something in it to play with. In this post we’ll create an EC2 instance, log onto it with SSH, install Apache and serve a simple web page from it.
To accomplish this we’ll need to add the following to our VPC:
- An Internet Gateway (IGW)
- A subnet with a route to the IGW
- An EC2 instance
- A security group that allows incoming web and shh traffic
- A key pair to use to log on to our server
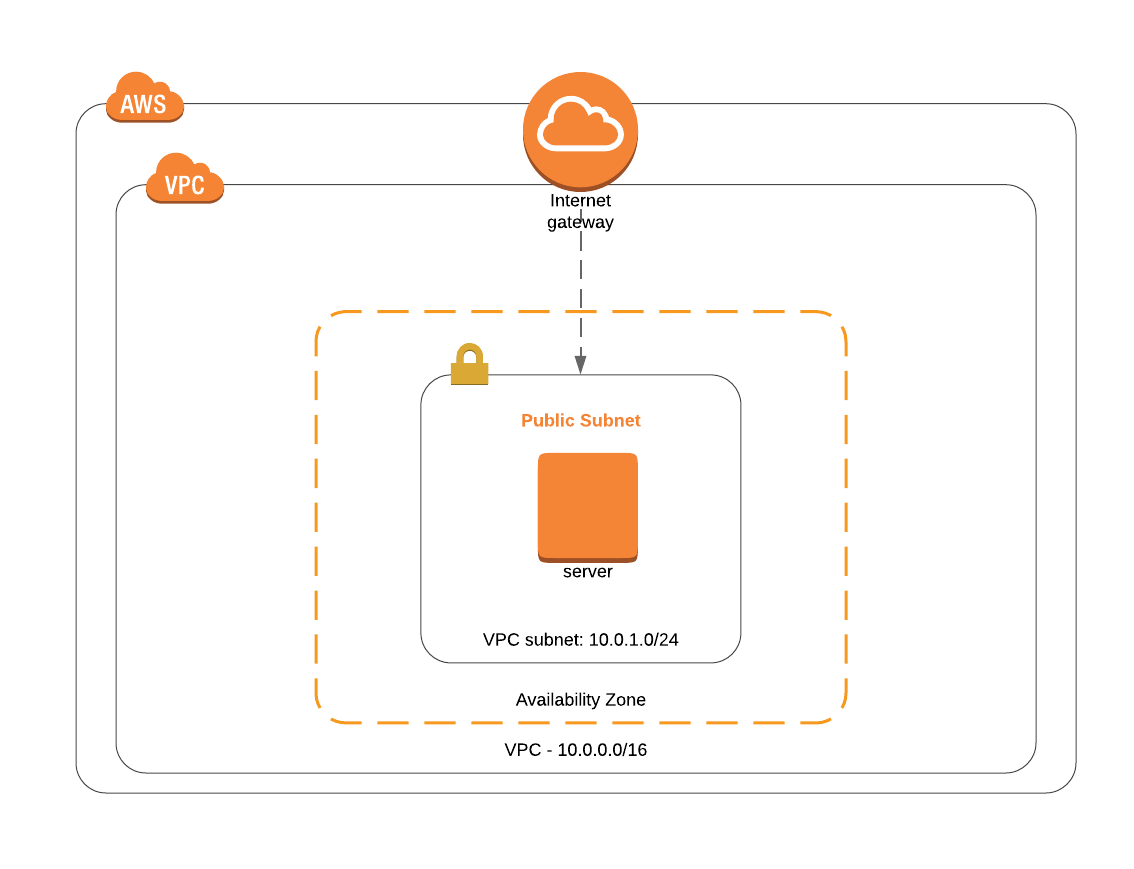
This is what we’re going to build.
For the key pair, if you already have one in AWS then you can reuse that, otherwise in the Console go to EC2 -> Key Pairs, create a new one and download it. Remember that key pairs are region specific so you’ll need to create it in the same region you want to create your infrastructure. Windows users, check out this post on using ssh in Window if you are unfamiliar with using ssh.
First up, let’s add the internet gateway, this is a nice easy one. The IGW allows traffic in and out of your vpc, without one of these you won’t be able to do much. Remember, you can only have one IGW per vpc so let’s add it to the vpc.tf file:
resource "aws_internet_gateway" "igw" {
  vpc_id = "${aws_vpc.vpc.id}"

  tags = {
    Name  = "demo_igw"
  }
}
The one required parameter here is the vpc to add it to. We use the interpolation syntax to set the id to our defined vpc id.
Next up, we add the subnet. A subnet is a logical division of your network. We need to say which availability zone the subnet will go in and give it a CIDR block range. A subnet can only sit in one availability zone and CIDR blocks can’t overlap with other subnets. Add a new file: subnets.tf
resource "aws_subnet" "public_subnet_a" {
  vpc_id                  = "${aws_vpc.vpc.id}"
  cidr_block              = "10.0.1.0/24"
  map_public_ip_on_launch = true
  availability_zone       = "eu-west-1a"

  tags = {
    Name = "Subnet pub eu-west-1a"
  }
}
We set the CIDR block to 10.0.1.0/24 which means anything in this subnet will get a private ip between 10.0.1.0 - 10.0.1.255. Note that AWS reserves some ips from the subnet range so the usable number of addresses is actually less than 256. map_public_ip_on_launch is set to true so any instances launched into this subnet will get a public ip address by default. The availability zone is set to eu-west-1a, remember to change this if you are using a different region.
The subnet will be public so will need a route to the IGW. We need 2 components to do this, first we define a route table that has a route to the IGW, then we create an association between this route and our subnet. Let’s add a new file, routes.tf:
resource "aws_route_table" "internet_route" {
  vpc_id = "${aws_vpc.vpc.id}"

  route {
    cidr_block = "0.0.0.0/0"
    gateway_id = "${aws_internet_gateway.igw.id}"
  }
}

resource "aws_route_table_association" "public_subnet_a_association" {
  subnet_id      = "${aws_subnet.public_subnet_a.id}"
  route_table_id = "${aws_route_table.internet_route.id}"
}
A route table always has an implicit route to the rest of the VPC so is not explicitly defined. The route we add to the route table says that any non-local traffic (0.0.0.0/0) should be sent to the IGW.
Nearly there, next we’ll define a security group in a new file, securitygroup.tf, to apply to our EC2 instance that will define rules for the traffic that can reach it.
resource "aws_security_group" "demo_sg" {
  name        = "demo_sg"
  description = "Allow inbound http / ssh traffic"

  ingress {
    from_port   = 80
    to_port     = 80
    protocol    = "tcp"
    cidr_blocks = ["0.0.0.0/0"]
  }

  ingress {
    from_port   = 22
    to_port     = 22
    protocol    = "tcp"
    cidr_blocks = ["0.0.0.0/0"]
  }

  egress {
    from_port   = 0
    to_port     = 0
    protocol    = "-1"
    cidr_blocks = ["0.0.0.0/0"]
  }

  vpc_id = "${aws_vpc.vpc.id}"
}
We define 2 ingress rules that say http (port 80) and ssh (port 22) from any source ip should be able to reach the instance. The egress rule says that all outgoing traffic is allowed. Note that we don’t need a Network Access Control List (NACL) because a subnet is implicitly associated with a default NACL that allows all traffic. I’ll have more to say about security groups and NACLs in a future post.
Now we can finally define our instance: ec2.tf
resource "aws_instance" "server" {
  ami                    = "ami-0bdb1d6c15a40392c"
  instance_type          = "t2.micro"
  vpc_security_group_ids = ["${aws_security_group.demo_sg.id}"]
  key_name               = "pete-eu-west-1"
  subnet_id              = "${aws_subnet.public_subnet_a.id}"

  tags {
    Name = "Web Server"
  }
}
The ami I’ve specified is for an AWS Linux 2 instance, note that amis are region-specific so you might need to change this. We add the security group to our instance using the vpc_security_group_ids property. Note that this is an array so multiple groups could be associated. Set the key name to the one created in the first step.
We’re putting the instance in our public subnet so it should get a public ip address by default. This will be useful to know so let’s add it to outputs.tf:
output "server_ip" {
  value = "${aws_instance.server.public_ip}"
}
OK, let’s spin it up! First run a terraform plan to check everything looks good then terraform apply to create it. If all goes well then you should get the ip addres of your new server as an output.
Apply complete! Resources: 7 added, 0 changed, 0 destroyed.

Outputs:

server_ip = 34.240.172.101
vpc_id = vpc-023c619f5d94a23d4
Let’s use that ip to ssh onto our server:
ssh -i pete-eu-west-1.pem ec2-user@34.240.172.101
Substituting the name of your key and the ip of your server.
Now let’s install Apache and setup a simple web page. Enter the following commands.
sudo yum install httpd -y
sudo service httpd start
sudo sh -c "echo 'Hello World!' > /var/www/html/index.html"
Now open up your web browser and enter the server ip into the address bar. Hopefully you should see your “Hello world!” message.
And with that we’re done. OK, that was a lot of work just to display a simple hello world message but we now have a solid base on which to build.
Next time we’ll automate the installation of the web server and creation of the web page. Don’t forget to terraform destroy your infrastructure if you are not going to use it for a while.